Friday, November 18, 2011

Giveaway Winner: Facebook 200 Fan Giveaway!


 Thank you to all who entered my latest giveaway! It was so great to read what you all are thankful for! 

The winner will receive a matching Snack Sack and Ouch Pouch of their choice! 

Girl Prize:


 Boy prize:


And now...for the winner...comment #10!! Crystal, who is 'thankful to be going home for Thanksgiving after 3yrs of being away!'


For some reason, some of you had difficulty leaving a comment, so you left one on my Facebook page. I decided to do a seperate drawing for you! Lucky!

The lucky Facebook winner is Amy Smith, who is thankful for 'having such dear Laredo friends!'.
She barely got her comment in on time!

Congratulations to you both, Crystal and Amy! I'll contact you both to see which prize you want!

Wednesday, November 16, 2011

Featured: Ann Kelle!

Lily is stealing hearts over on Ann Kelle's blog! Eeeek! I heart Ann Kelle and her fabric, big time. When she contacted me asking if she could use Lily's picture, to say that I was excited, was a huge understatement. Go and take a peek!


Monday, November 14, 2011

Giveaway: I've reached 200 fans!

I reached 200 fans on Facebook! How fun and exciting. As a big 'thank you', I decided to do a giveaway! Yea for you! 

What could I be giving away, you ask? 

I decided to give away one of my brand new Snack Sacks and a matching Ouch Pouch

The Snack Sack is perfect for your diaper bag or purse! It's lined with a food safe vinyl, with a Velcro closure. I squared off the corners so it stands up while open! Now isn't that nifty?  Just hand wash with dish soap and turn inside out to dry.


What is an Ouch Pouch? I've been making these for awhile but haven't ever put them into my shop. It's a little square pouch filled with rice that makes a nice alternative to an ice pack when your little one gets a boo boo. My son, Bobby, loves it. He always asks for it when he gets hurt. I keep two in the freezer at all times! It has also come in handy when Bobby has had a high fever.

The winner will get to choose between the 'girl' prize or the 'boy' prize. Just let me know which you would prefer.

 Girl prize. Crazy Dots!

Boy prize. Stars!

What do you need to do to win? Simple. Just leave a comment on this post telling me what you are most excited/thankful for this holiday season. Winner will be randomly chosen by a random number generator.  Please leave your email address so I can contact you if you win. Winner will be announced this Friday afternoon. Good luck to everyone who enters!
I'll start: I'm so excited and thankful to spend Thanksgiving with my whole family on my dad's side. I missed the last family reunion because I had just given birth to Bobby, but I will be there for this one! We've been planning this for almost 2 years now and I can't wait!

Sunday, November 13, 2011

Craft Show: Holly Jolly Christmas Market 2011

 Whew! This weekend flew by in a blur of fabric and friends, old and new. I had such a great time at my very first craft show, the Holly Jolly Christmas Market. It was a huge success. The planning team and I could not have been happier with how it turned out.

As far as I know, Laredo doesn't have craft shows very often, so I am excited to say that we will do it again! Hopefully in the spring. My table turned out better than I imagined! It was cute and just the right amount of color and clutter. I always love going to booths that are cluttered in an organized way...which was what I had hoped to do with my table. I think I pulled it off! I took a ton of pictures to show you, so sit back and enjoy!

The whole table at a glance. Special thank yous to my father in law for giving me the hat rack that was just sitting in his office unused, my mom who gave me the toddler dress form for my birthday and to my sister, Casey, for the table cloth! It worked out perfectly.

 I found most of my display items at the Round Top Antique fair that I go to almost every year. Just a little cleaning and spay paint was all I needed!

 The hat rack! It worked out great...especially because the top spun around! It was meant to hold my aprons and kitchen towels!

 These babies were my top seller. I even went home after the first night and made some more! Good thing, because I sold all but 2 of them. I will make more and put them in my shop as soon as I can.

 Snack Sacks. New to my shop, these are perfect for the mom on the go! Lined with a food safe nylon, they are great for the diaper bag or your lunch!

 I got this metal display rack at Round Top this past visit. I thought it would work well to hold my headbands and bibs, and it did!

This grandmother and her granddaughter duo used my Simple Craft Show Apron tutorial to make their lovely aprons! I was so excited to know that they used the tutorial. It made my night!

I have already signed up for my next craft show! It's only in a few weeks, which means I have a lot more sewing to do....and I still need to finish my Christmas gifts!

Thank you to all who came out to the Market, I enjoyed meeting you!

Thursday, November 3, 2011

Tutorial: Simple Craft Show Apron


I will be participating in my very first craft show next weekend! I am so excited. I have been sewing and creating like a mad woman to get everything finished. Last night I finished the last thing on my 'must do' list, so now I can sit back and relax a little bit. Now I'm moving on to my 'if you have left over time, do this' list. 

At the top of my second list was to make a craft show apron. I've always said that if I ever did a craft fair, I would make a cute functional apron for myself. I thought I would create a little tutorial for you all as well. When I say simple, I mean it was SUPER simple. After I cut out the fabric, it only took me about 30 minutes, and that was with a few interruptions. (Ahem...my sister kept calling me...)

Simple Craft Show Apron Tutorial:
Supplies:
Fabric of your choice (the paisley fabric is a heavier weight, which I thought made the apron a bit more sturdy)
Ribbon ( I chose ribbon in order to save time. I didn't feel like creating a tie to match...call me lazy...)
1 package bias tape (Again, a time saver. This would also be cute if you decided to make your own bias tape.)
Matching thread
Marking pen or pencil
Scissors


 Step 1:
Cut the main back panel: 21"x 22"
Cut the pocket panel: 21"x 12"
Cut the waist band: 22" x 8"
Cut the ribbon: 2 pieces ~46" each (you can play with the length of the ribbon. I wanted it to wrap around, so if you do not want that, cut the ribbon shorter).


  Step 2:
Iron and fold both the main panel and pocket panel in half, wrong sides together. 
Edge stitch across the top folded edge of the pocket panel to give the pocket a nice finished look.
Place the pocket panel on top of the main panel, matching up all the raw edges.


Step 3: 
Pin and sew a basting stitch along the 3 raw edges of the pocket panel to hold the pocket in place (You will be sewing on the bias tape later)
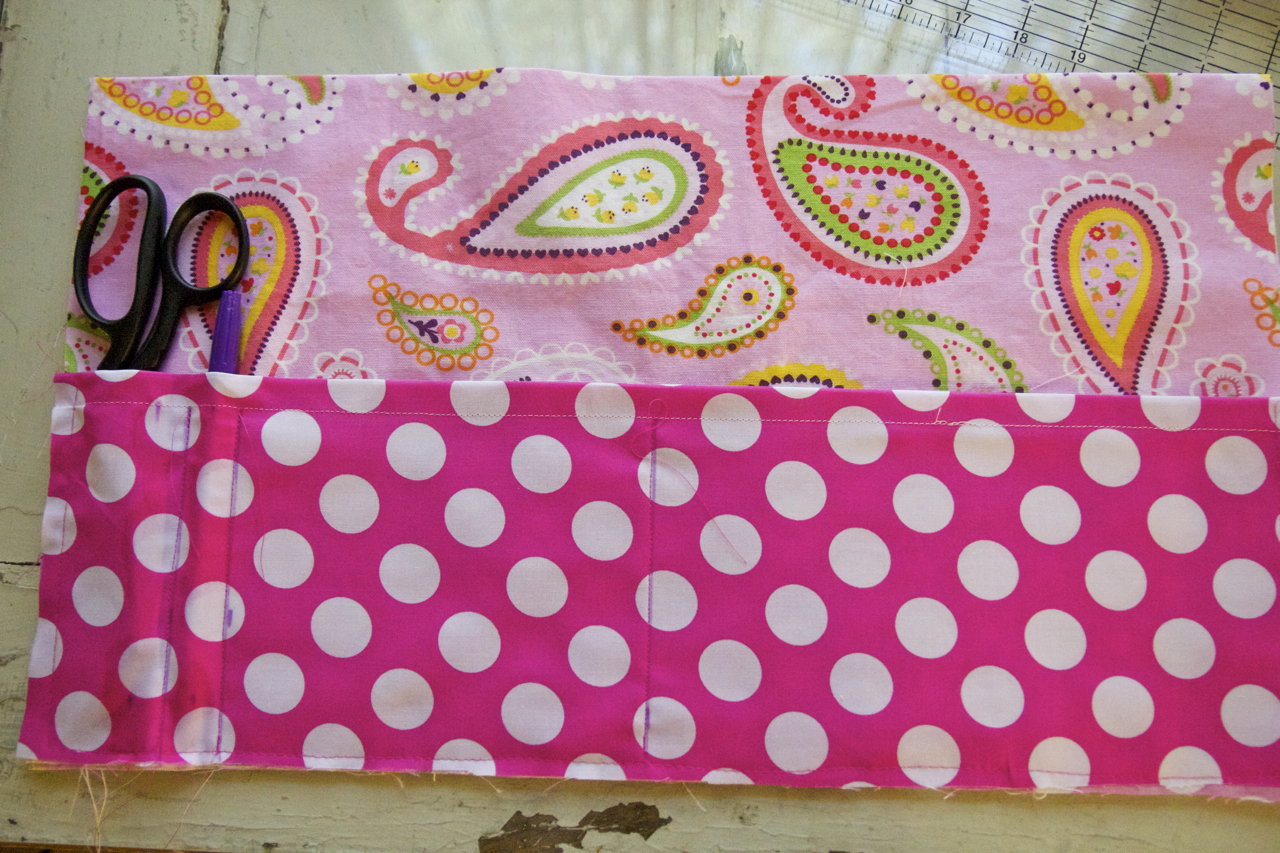

 Step 4:
Draw with a fabric marking pen or pencil lines for your pockets. I chose to have two large pockets, with 2 smaller ones for pens and a pair of scissors. You can see where I drew my lines in the picture above.
Sew directly on top of the lines to create your pockets, backstitching at each end.


Step 5:
Pin your bias tape around all 3 raw edges, including the back panel. For me, the more pins the better. 
Edge stitch along the bias tape, backstitching at each end, making sure to keep the fabric in between the bias tape. Go slowly around the corners, this can be tricky!
This will enclose and finish off all the raw edges. 
Set aside.


 Step 6:
Fold the waistband in half wrong sides together and press. 
Open waistband, fold each short raw edge about a 1/2" toward the wrong side and press.
Now fold each long raw edge about 1" toward the wrong side and press. It should look similar to the picture above.


Step 7:
Place one of the ends of your ribbon close to the ironed crease in your waistband. Fold the waistband over and pin in place. Do this to the other side with the other piece of ribbon also.


Step 8:
Slide the top of the main panel in between the folded waistband about an inch. Re-fold waistband and pin through all 3 layers (waistband, main panel, waistband). 
Sew around all 3 open edges, attaching the ribbon and main panel to the waistband.


Step 9:
I don't have this pictured, but run a flame along the raw edges of the ribbon to seal the ribbon to prevent fraying. 


That's it! You now have yourself a super cute, super simple craft show apron!!

Related Posts Plugin for WordPress, Blogger...