Monday, December 3, 2012

Tutorial: Advent Calendar


The Christmas season is upon us! What better way to bring in the holiday and remember the reason for the season than with an Advent Calendar?

I made my very own Advent Calendar with fabric from Ann Kelle's 'Jingle' line of Christmas fabric. I love it!  If you would like to see it and the tutorial, go here.

As an added bonus, you can also find my tutorial on the 'Handmade Holidays' list over on Sew, Mama, Sew! Blog!! Wow, what an honor! I have spent countless Christmases searching through those lists to find the perfect gifts to make for family and friends. Such great tutorials and ideas!


This is the first year that we have done an Advent Calendar. I am real excited to share in this special time with my kids. Bobby already asks every morning if we can open the next bag to see what's inside.

Here is my list of our activites:

Decorate Christmas tree
Decorate Grandma's tree
Read the story of Jesus' birth from the Bible
Set up the Little People Nativity
Christmas craft
Snowman pancakes for dinner
Birthday party for Jesus at church
Movie and hot chocolate night: Frosty the Snowman
Paint some ornaments on our rocks in our yard (our front yard is all rocks)
Bake and decorate sugar cookies
Take cookies to our sweet neighbors
Write a letter to Santa
Pizza night
Movie and hot chocolate night: Elf
Chick-fil-A with Santa
Make a gingerbread nativity
Pick out toys to give away and say a special prayer for the kids who will get their toys
Christmas craft
Open a new ornament and put it on the tree
Read Christmas books before bed in our Christmas jammies
Travel to Sugar Land/visit with friends
Christmas craft/visit with more friends
Look at Christmas lights
Bake cookies for Santa/Sprinkle reindeer food


I can't wait to make some memories with my family! What traditions do you have with yours?


Sunday, September 30, 2012

Tutorial: Quick and Easy Skirt


I don't normally make clothes, they've never turn out well for me and most of the time it's just cheaper to buy anyway. But I really wanted to try and make a simple skirt for Lily for Halloween. I found the fabric and whipped one up in about 30 minutes! It turned out really cute. My first article of clothing that I would actually be ok with her wearing. 


I made Lily a cute Halloween skirt, then made her this lavender chevron print one below for her birthday party. Sadly, she spilled coffee all over it about 5 minutes into the party. (Not her coffee, her Daddy's.) Arg. I got the stain out, but she didn't get to wear her pretty skirt. 

I thought I would share with you how I made these easy skirts!  I know it's not rocket science, and I'm sure there are better and more efficient ways to sew a skirt, but this is how I did it, so I hope you enjoy!

Gather supplies:
Main fabric and coordinating fabric for trim
3/4" Elastic
Iron
Scissors/marking pen/ruler/cutting mat
Sewing machine/matching thread
Large safety pin/straight pins


Step One: Cut main panels
(These are the measurements I used for my 2 year old daughter, who is very petite, you may alter them to fit your little one's needs)
Cut two main panels to 10"x18"


I cut both my pieces at the same time so I could cut down on cutting. (No pun intended. :) )


Step Two: Cut the A-line
To make the skirt a little more A-line, I made a mark at the top of the fabric about 1 1/2" from the right side, then drew a line from the mark down to the bottom right corner. I just used my ruler to give me a straight line. 


 I then folded the fabric in half (remember, there are two pieces there) and cut along that line. 


See? I now have two pieces of main panel ready to go. 


 This step isn't shown, but cut two trim pieces, 3"x18".


Step Three: Attach the trim


Take each main panel and lay it face down with the wrong side showing. Lay the trim piece along the bottom (wrong side showing) matching up the two long raw edges. Pin in place and sew along the edge using a 1/4" allowance. (You will notice that the trim pieces are not cut at an angle like the main piece. I forgot to do that step, so I jus trimmed them to match after attaching them. No biggie.)


After you sew the trim on, open it up and lay it flat, with the right side of your main panel facing up. Iron the seam toward the main panel. Fold and press the remaining long raw edge of the trim piece a 1/2". 


Then fold the entire trim piece up towards the main panel and press. Pin in place. Sew along both of the long edges of the trim piece. I used about a 1/4" seam allowance for both edges.  Sewing along the bottom edge will give it a nice polished look and will keep the trim looking nice even after going through the wash. 

Repeat with the other main panel and trim.


Step Four: Attaching main panels together

Lay both main panels (with attached trim, which you notice, I trimmed to match the A-line angle) right sides together and pin along one angled edge. Sew a 1/2"seam allowance along this edge. 


Open and press the seams open. (I forgot to do this step with this skirt, but you may want to cut the excess seam allowance with some pinking shears or serge the seam first.)


Step Five: Make the casing for the elastic and finish!

Fold the top raw edge over towards the wrong side 1/4" and press. Fold again 1" and press again. Pin in place. This will be the casing for your elastic.
Sew along the bottom edge of the casing as close to the edge as you can. You don't want to make the casing too small or your elastic won't fit.


Once the casing is finished, attach the safety pin to one end of the elastic and thread it through. Be careful not to pull it all the way through. 

**My daughter's waist measured 19", so I cut the elastic to 17". 


Once your elastic is threaded, pull and adjust the casing/skirt so that the fabric isn't all bunched up at one end. Fold your skirt in half (right sides together) and pin along the raw edge. Make sure you catch both ends of elastic at this step.


Sew a 1/2" allowance making sure to back stitch at each end. Trim your seam allowance and any long threads you may see. 


Ta Da!! You have made a skirt!! 

Monday, September 17, 2012

Chevron-Striped Baby Quilt


With baby boy due 4 weeks from today, to say that I have been nesting is an understatement! I've been organizing, cleaning and doing lots of sewing! Some sewing for baby, some for other projects around the house or for my shop. 

For the nursery, I decided to go with aqua, orange and gray. Chevron is my new obsession, so I had to incorporate that, along with some polka dots. 

This being my third child, I hadn't done much for his room, besides make curtains. I decided not to make a bumper or bed skirt this time, since I don't use them for very long. But I really wanted to make him a quilt. 


I chose some orange and aqua chevron from this Riley Blake collection, as well as some coordinating polka dot, also from Riley Blake. While I am not really doing an 'elephant theme' in the room, I have always loved this print so I included that as well. 

I decided to change up the predictable square quilt pattern and do stripes instead. I am so glad I did. Not only did I not have to cut out a billion squares (cutting strips is soo much easier and less time consuming),  I LOVE how it turned out! 


I used just the gray and white polka dots for the back of the quilt and gray bias tape for the binding. I really wanted white, but Hobby Lobby didn't have enough, so gray it was!  I used this tutorial, found on Pinterest, to help me with the corners of the bias tape. It was so easy! My corners usually come out funky looking, so I'm glad I took the time to look up how to do it correctly. 


It's hard to see in the picture below, but I quilted a large chevron design over some of the stripes. This is my first time to actually quilt something, I am so proud! I only had to use my seam ripper once. Ha! 


Can't wait for my little one to snuggle up in his new quilt!

Monday, July 16, 2012

Featured: Advent Garland Tutorial

Christmas is just around the corner...WHAT?!? 

No really, when you think about it, school is starting next month...then Halloween, then Thanksgiving, and before you know it...Christmas...and hopefully some cooler weather!

I am so excited to share with you a tutorial I worked on for Ann Kelle, using her new Jingle line of Christmas fabric. It is so fun and festive! 

I made this super easy Advent garland. I love it! Can't wait to fill it with notes and fun activities for me and my family to do come December. 

Go check it out here. She's posting more fun Christmas tutorials this week, so check back for some holiday inspiration!


Now if only I had a fireplace to string this on...


Wednesday, June 20, 2012

'POW! BAM! SNAP!' Superhero Quilt


 Hello! Bet you think I forgot all about my little blog, huh? Truth be told, I didn't forget about it, but I took a LONG break from crafting/sewing. About a 4 month break. Sometimes I get in these ruts where I just am not feeling it. The sewing machine, that is. Plus, we moved, so I have been getting the house in order, organizing and unpacking.

But I'm BACK with a POW!! 


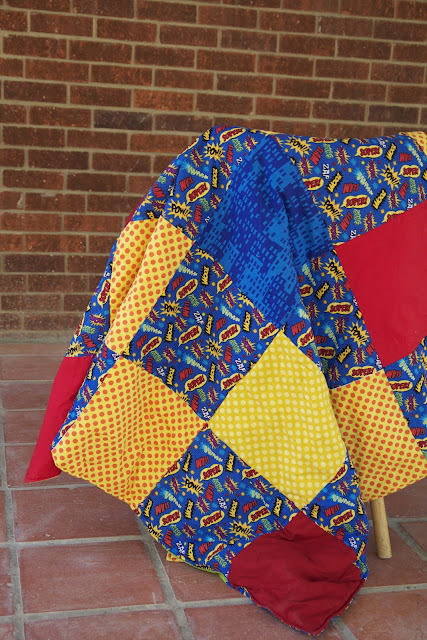
I have been wanting to make a superhero quilt for Bobby for months. Probably 6 months or more. I've had this vision in my head...and once I found the perfect fabric, it all fell into place!  I wanted to do a generic quilt, no characters. I thought it would be fun to have large applique squares with action words, like 'POW! BAM! ZOOM!'


How perfect is this superhero fabric?!? I stumbled upon it on Etsy and ordered 1.5 yards (all she had left). Once I received it, I realized it was from Jo Ann's Fabrics.  Since we don't have one here, I had my mom and sister go the their local stores to look for some. I got lucky and my sister found 2 yards. I've been told it's been discontinued, which really bums me out, because I know I could make a lot of cute things for little boys with this. I've since looked at 2 other Jo Ann's and search Etsy all the time, but no luck. I'm leaving for the Dallas area next week, so I'm hoping to get lucky!


In addition to the superhero fabric, I used some 'Ta Dot' from Michael Miller and 'Superhero City Nights Skyscraper' also from Michael Miller. I love how bright it is!


Can you tell he loves it? It was so fun to make, knowing how much he would love his cool new superhero quilt!


Now to make one for Lily's big girl bed...before I get too big to crawl around on the floor! Which, by the way, is excellent exercise for a preggo like me.


Friday, March 23, 2012

Pinterest Made Me Do It: Dress-up Closet

Hey! I'm back with another fun and easy project inspired by Pinterest. There are so many fun things and ideas that I want to do, but there just isn't enough time! My son is really into dress up. Super hero dress up, of course! He has also had a thing for hats ever since he was little (he's a big boy now, ya know!) so he has quite the collection. 

There are a couple of dress-up closets/cabinets floating around Pinterest, which I think are just genius. I really wanted to make Bobby (and Lily) one. I remembered that we had this cabinet. It was sitting in storage for almost 2 years, so when we finally got it out, it clicked. 

Dress-up closet!


This is seriously the easiest project to do. I took out the adjustable shelf and added a tension rod for hanging the growing collection of costumes. I bought some hooks that stick on (I'm telling you...easy) and added them to the inside of the doors to use for hanging masks, necklaces...you name it. 

I also added 2 hooks on one side to hang Bobby's multiple capes. Which, if you need a fun cape tutorial, check out my Reversible Super Hero Cape tutorial


I find that the flea market is a great place to get cheap costumes. Especially around Halloween. I got the Spiderman, Bat Girl, Captain America, and Super Man Cape all at the flea market! For around $8 total. Bobby doesn't care if they are too big for him, he'll grow into them and it gives the costume longevity. He keeps telling me all the other super hero costumes he still needs to complete his collection. I guess it's back to the flea market for me! Lily already has a couple costumes as well. I know she will love this cabinet just as much as Bobby when she gets a little older.


I didn't take a picture of this, but I put a full length mirror on the other side of the cabinet as well. The drawers are perfect for all the hats, masks, swords, fairy wands...

My husband kindly spray painted the knobs for me to add a splash of color for fun. 

I really love how it turned out! We will get years and years of fun play time out of this dress-up closet. I'm so glad I found this idea on Pinterest! 


Bobby is too...

Saturday, March 17, 2012

Exciting news!

If you don't already know...I have some news...

 Coming Fall 2010!


Those top pictures are nice, but here's how it really went down:


This is part of the reason I have had no desire to sew lately...I am just too darn tired! Not to mention dizzy...so dizzy. But I should be back soon with some fun projects! I have one Pinterest project in the works...I will reveal it soon!

Until then...

Friday, March 9, 2012

Featured: Simple Girls Headband Tutorial

I realize I have been MIA for awhile, but I have good excuses, honest! I have been hard at work on some tutorials for Ann Kelle. I posted about my first one last week, and yesterday my second one was featured on her blog!

This headband was inspired by my 10 minute headband. I altered it a bit for my daughter. She looks so adorable in these!

Perfect for the summer. 


I have more excuses why I haven't been around, but I'll share those with you later. :)


Tuesday, February 28, 2012

Featured: 10 Minute Head Band Tutorial


I am so excited to tell you that I am over at Ann Kelle's blog today! She asked me to do some tutorials for her, so of course I said 'YES'!


Got 10 minutes, some scrap fabric and a rubber band? Then you have all you need to get started! Head on over and check it out

I'll be doing a few other tutorials for her as well, which I can't wait to share with y'all. I will be sure to let you know when to go take a peek!


Saturday, February 18, 2012

Mama's 'Lil Helper

Today I was trying to get some sewing done during Lily's nap, when Bobby came in wanting to 'help'. He was so insistent that he help me make a pillow for his good friend, Tagan. Almost in tears, he was trying to convince me so bad. So of course I said "yes"! I quickly cut two squares and sewed them together, then he stuffed the pillow. He thought it was so cool that he made something!  He had a blast cutting, stuffing, and using a marking pen to measure and draw on the fabric.

 I have the sweetest little boy ever. I mean, look at that face!


So happy to be helping Mama!


Cutting....


Stuffing...he thought it looked like clouds!


More stuffing...


Ta da!!

Related Posts Plugin for WordPress, Blogger...